
Every API gets rate limited eventually.
Sometimes it's because a customer's cron job started looping. Sometimes it's because a partner integration paginated incorrectly and asked for page 1 forty thousand times in twenty minutes. Sometimes it's a credential stuffing attack hitting /login from a botnet that didn't read your terms of service. Sometimes it's an internal team that wrote a "quick script" against production on a Friday afternoon.
You can't predict which one will arrive first, but you can predict the shape of it. A handful of clients will, very suddenly, decide to send you a thousand times more traffic than you planned for. If you have no rate limiting in place, the cheap thing they're doing - a small endpoint, a tiny query - will turn into the most expensive thing in your system, and the rest of your users will get slow responses or timeouts while you figure out what's going on.
Rate limiting is the politeness layer of your API. It tells callers, "you've used your share for now, come back in a moment." Done well, it protects the database, protects the cache, protects downstream services, and makes abuse expensive enough that it stops being worth it. Done badly, it locks out the wrong people, leaks information about your auth state, or quietly fails open under load.
Let's walk through what actually works in Node.js - the algorithms, the storage choices, the gotchas, and the parts that are obvious only after you've been paged for them.
What "rate limit" even means
Before picking an algorithm, decide what you're counting and against what.
You're counting requests - but per what? Some natural choices:
- Per IP - easy, but proxies, NATs, and IPv6 prefixes make it messy. Mobile carriers and university networks share IPs across thousands of users.
- Per authenticated user - accurate, but only works once the request is identified. Useless for the login endpoint itself.
- Per API key / per tenant - usually the right answer for B2B APIs and SaaS plans.
- Per route -
/loginand/healthshouldn't share a budget. - Per route + per identity - the most useful combination in practice.
A real production system usually has several of these stacked. A typical setup looks like "global per-IP cap on unauthenticated routes, per-user-and-route cap on authenticated routes, per-tenant cap shared by all that tenant's users for write endpoints, and a separate stricter cap on /login and /password-reset."
The key is to think of rate limits as a small set of named policies, not one global number. A policy is a rule like "30 req/min per IP on /login, with a 5-minute lockout after 10 failures" - and your code should make policies first-class so adding a new one doesn't require touching the limiter library.
The four classic algorithms
Four algorithms cover almost every real-world need. Each trades accuracy for memory or latency in a slightly different way.

Fixed window
The simplest one. Bucket counts requests inside a fixed time window - say, "60 requests per minute" - and resets to zero at the top of every minute.
type Counter = { count: number; resetAt: number };
const buckets = new Map<string, Counter>();

export function fixedWindow(key: string, limit: number, windowMs: number) {
  const now = Date.now();
  const b = buckets.get(key);

  if (!b || b.resetAt <= now) {
    buckets.set(key, { count: 1, resetAt: now + windowMs });
    return { allowed: true, remaining: limit - 1, resetAt: now + windowMs };
  }

  if (b.count >= limit) {
    return { allowed: false, remaining: 0, resetAt: b.resetAt };
  }

  b.count += 1;
  return { allowed: true, remaining: limit - b.count, resetAt: b.resetAt };
}
Cheap to implement, cheap to store (one integer per key), trivial to reason about. The problem is the boundary: a caller can send 60 requests in the last second of one window and another 60 in the first second of the next, hitting you with 120 requests in two seconds while never breaking the 60/min limit. For a public API this is usually fine. For /login it isn't.
Sliding window log
Store every request's timestamp. To decide if a new request is allowed, drop timestamps older than the window and count what's left.
const logs = new Map<string, number[]>();

export function slidingWindowLog(key: string, limit: number, windowMs: number) {
  const now = Date.now();
  const cutoff = now - windowMs;
  const arr = logs.get(key) ?? [];

  // Drop expired timestamps
  while (arr.length && arr[0] <= cutoff) arr.shift();

  if (arr.length >= limit) {
    return { allowed: false, remaining: 0, retryAfterMs: arr[0] + windowMs - now };
  }

  arr.push(now);
  logs.set(key, arr);
  return { allowed: true, remaining: limit - arr.length };
}
Exact. No boundary problem. Also the most expensive to store - every active key holds up to limit timestamps, and you do a small amount of work on every check. For 60/min over a million active keys, that's 60 million timestamps in memory or in Redis. Use it when accuracy matters and limit is small (like login attempts, password resets, or webhook deliveries), not for general API throughput.
Sliding window counter
A compromise that gives you "close enough" accuracy with fixed-window memory. Keep two counters: the current minute and the previous minute. When a request arrives, compute a weighted average based on how far into the current window you are.
type Window = { current: number; previous: number; windowStart: number };
const windows = new Map<string, Window>();

export function slidingWindowCounter(key: string, limit: number, windowMs: number) {
  const now = Date.now();
  let w = windows.get(key);

  if (!w || now - w.windowStart >= 2 * windowMs) {
    w = { current: 0, previous: 0, windowStart: now };
  } else if (now - w.windowStart >= windowMs) {
    w = { current: 0, previous: w.current, windowStart: w.windowStart + windowMs };
  }
  windows.set(key, w);

  const elapsedRatio = (now - w.windowStart) / windowMs; // 0..1
  const estimate = w.previous * (1 - elapsedRatio) + w.current;

  if (estimate + 1 > limit) {
    return { allowed: false, remaining: 0 };
  }

  w.current += 1;
  return { allowed: true, remaining: Math.max(0, Math.floor(limit - (estimate + 1))) };
}
Two integers per key. No boundary spike. The accuracy is within a few percent of the true sliding window for almost all traffic shapes. This is the algorithm most production "Redis rate limiter" libraries actually use under the hood.
Token bucket
Tokens drip into a bucket at a constant rate up to a maximum capacity. Each request takes one token. No tokens, no request. This is the right model when you want to allow short bursts but enforce a long-run rate.
type Bucket = { tokens: number; updatedAt: number };
const buckets = new Map<string, Bucket>();

export function tokenBucket(key: string, capacity: number, refillPerSec: number) {
  const now = Date.now();
  const b = buckets.get(key) ?? { tokens: capacity, updatedAt: now };

  // Refill since last check
  const elapsedSec = (now - b.updatedAt) / 1000;
  b.tokens = Math.min(capacity, b.tokens + elapsedSec * refillPerSec);
  b.updatedAt = now;

  if (b.tokens < 1) {
    const retryAfterMs = Math.ceil(((1 - b.tokens) / refillPerSec) * 1000);
    buckets.set(key, b);
    return { allowed: false, remaining: 0, retryAfterMs };
  }

  b.tokens -= 1;
  buckets.set(key, b);
  return { allowed: true, remaining: Math.floor(b.tokens) };
}
Two numbers per key - same memory as the sliding counter. The behavior is the most "human-friendly" of the four: a quiet client builds up a small reserve and can briefly spend faster than the steady rate, which matches how real applications actually use APIs. AWS, Stripe, and GitHub all expose token-bucket semantics in their public limits.
Leaky bucket is the same idea inverted (requests fill a queue that drains at a constant rate) and is useful when you want to smooth traffic toward a downstream system rather than just cap it. For most API rate limiting, token bucket is the better default.
Picking one
The decision usually comes down to three questions:
- Do you care about exact accuracy? Login and password-reset - yes, use sliding window log. Public API throughput - no, sliding counter or token bucket is fine.
- Do you want to allow bursts? Token bucket. Otherwise sliding counter.
- Can you afford one Redis call per request? If yes, anything works. If no, fixed window in memory with a generous limit is better than no limit.
A common mistake is reaching for the "best" algorithm everywhere. You don't need a sliding window log to protect /api/products from a polite cron job. You probably do need one on /login. Match the algorithm to the threat model of each route, not to whichever one a blog post called "modern."
Why you almost certainly need Redis
In-memory limiting works exactly as long as you have one process. The moment you scale to two Node.js instances behind a load balancer, your limit doubles. Three instances, triples. Add autoscaling and the effective limit becomes "whatever your worst minute of capacity decides." That's not a rate limit, that's a suggestion.
The fix is to move the counter out of process memory and into something every instance shares. Redis is the obvious choice: single-threaded for atomic ops, fast enough that a single call adds ~1 ms, and supports the few primitives a rate limiter actually needs (INCR, EXPIRE, sorted sets, Lua scripting).
The fastest fixed-window implementation in Redis is two commands:
import type { Redis } from 'ioredis';

export async function fixedWindowRedis(
  redis: Redis,
  key: string,
  limit: number,
  windowSec: number,
) {
  const bucket = `rl:fw:${key}:${Math.floor(Date.now() / 1000 / windowSec)}`;
  const tx = redis.multi();
  tx.incr(bucket);
  tx.expire(bucket, windowSec);
  const [count] = (await tx.exec())!.map(([, v]) => v as number);

  return {
    allowed: count <= limit,
    remaining: Math.max(0, limit - count),
  };
}
Two round trips pipelined into one. The key embeds the window bucket, so a new minute automatically gets a fresh counter and the old key expires on its own. This is the workhorse of most public-API rate limiters and is what express-rate-limit uses when configured with a Redis store.
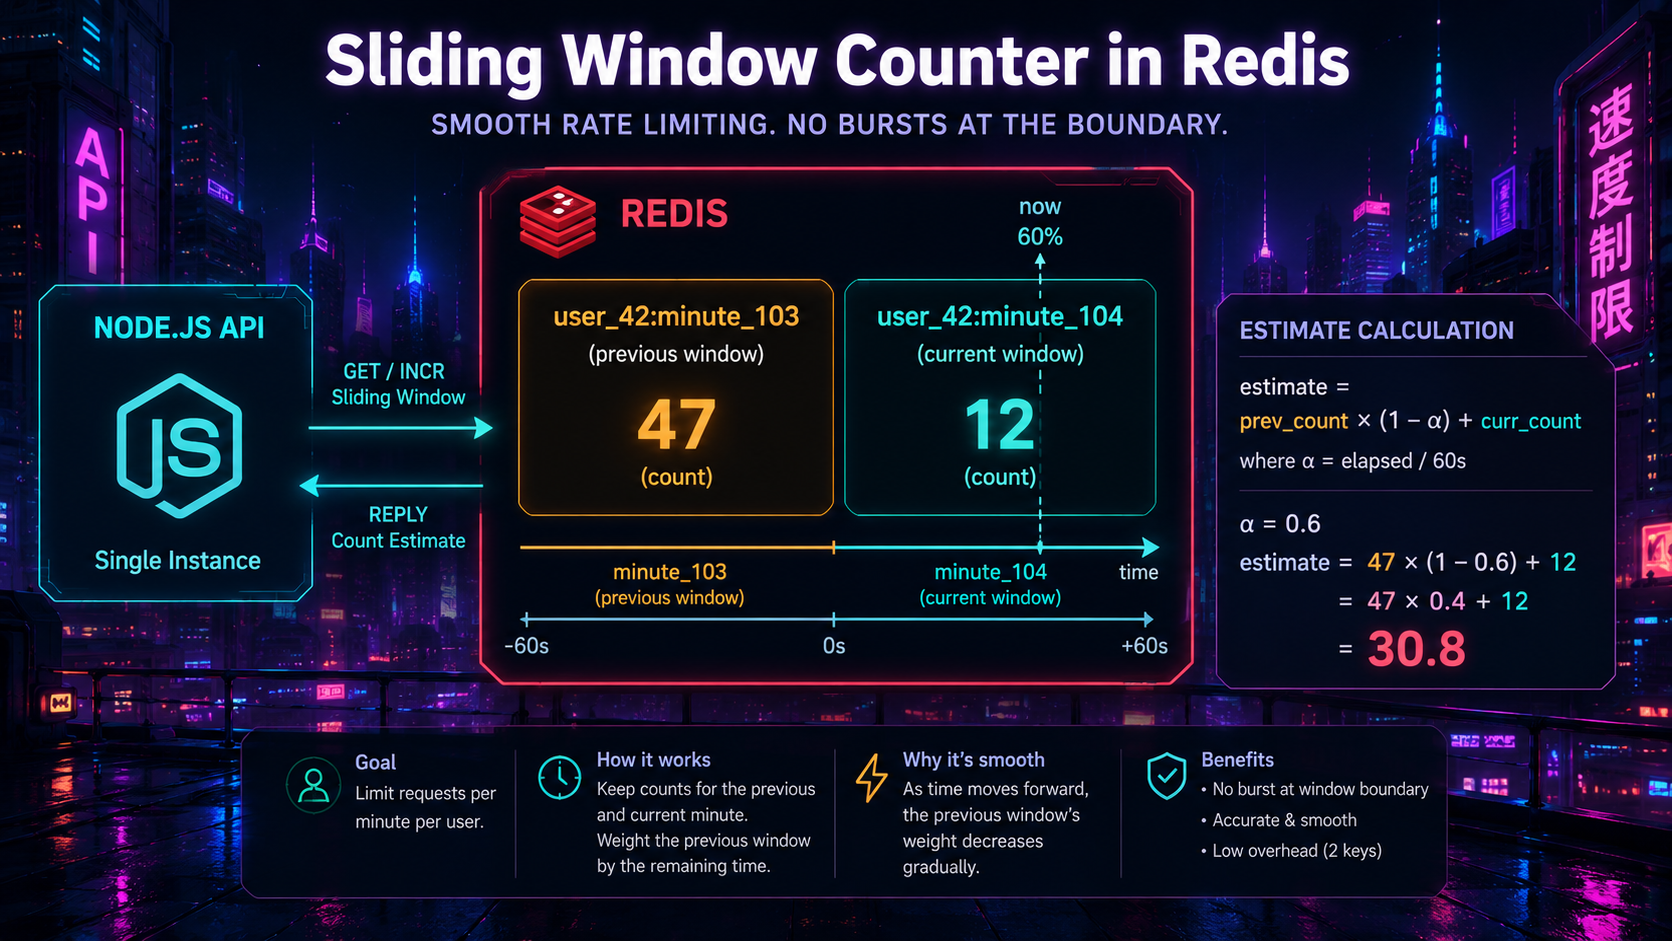
Sliding window counter in Redis (Lua)
The two-bucket trick from earlier translates into a tiny Lua script. Lua is the right tool here because it runs atomically inside Redis - you avoid the race conditions you'd get from issuing two INCR calls and a GET from Node.
local key_curr = KEYS[1]
local key_prev = KEYS[2]
local limit    = tonumber(ARGV[1])
local elapsed  = tonumber(ARGV[2])  -- 0..1, how far into current window

local curr = tonumber(redis.call('GET', key_curr) or '0')
local prev = tonumber(redis.call('GET', key_prev) or '0')

local estimate = prev * (1 - elapsed) + curr
if estimate + 1 > limit then
  return {0, math.floor(math.max(0, limit - estimate))}
end

redis.call('INCR', key_curr)
redis.call('EXPIRE', key_curr, 120)  -- keep ~2 windows around
return {1, math.floor(math.max(0, limit - estimate - 1))}import { readFileSync } from 'node:fs';
import type { Redis } from 'ioredis';
const SCRIPT = readFileSync('src/limiters/redis/slidingWindowCounter.lua', 'utf8');
export async function slidingWindowCounterRedis(
redis: Redis,
identity: string,
limit: number,
windowMs: number,
) {
const now = Date.now();
const currentMin = Math.floor(now / windowMs);
const elapsed = (now % windowMs) / windowMs;
const keyCurr = `rl:swc:${identity}:${currentMin}`;
const keyPrev = `rl:swc:${identity}:${currentMin - 1}`;
const [allowed, remaining] = (await redis.eval(
SCRIPT, 2, keyCurr, keyPrev, limit, elapsed,
)) as [number, number];
return { allowed: allowed === 1, remaining };
}Two GETs and at most an INCR and an EXPIRE, all atomic. One Redis round trip per request. This is more than enough for the vast majority of APIs - a single Redis node handles tens of thousands of these per second.
Token bucket in Redis
Token bucket is almost as small. The trick is to store tokens and lastRefillMs together (a hash or a single JSON-encoded string) and let the Lua script do the refill math.
local key       = KEYS[1]
local capacity  = tonumber(ARGV[1])
local refill_ps = tonumber(ARGV[2])
local now_ms    = tonumber(ARGV[3])

local data = redis.call('HMGET', key, 'tokens', 'ts')
local tokens = tonumber(data[1] or capacity)
local ts     = tonumber(data[2] or now_ms)

local elapsed = (now_ms - ts) / 1000
tokens = math.min(capacity, tokens + elapsed * refill_ps)

if tokens < 1 then
  redis.call('HMSET', key, 'tokens', tokens, 'ts', now_ms)
  redis.call('EXPIRE', key, 3600)
  local wait = math.ceil(((1 - tokens) / refill_ps) * 1000)
  return {0, math.floor(tokens), wait}
end

tokens = tokens - 1
redis.call('HMSET', key, 'tokens', tokens, 'ts', now_ms)
redis.call('EXPIRE', key, 3600)
return {1, math.floor(tokens), 0}
One round trip per request, atomic refill, automatic cleanup via EXPIRE. The redis-cell Redis module implements this in C if you want to skip the Lua entirely - it exposes a single CL.THROTTLE command and is the cleanest production option if your platform allows custom modules.
Wiring it into Express, Fastify, or Hono
The handler shape is the same regardless of framework. Read identity and route, run the limiter, return the standard headers, or send a 429 with Retry-After. Here's a framework-agnostic Express middleware that you can adapt:
import type { Request, Response, NextFunction } from 'express';
import type { Redis } from 'ioredis';
import { slidingWindowCounterRedis } from '../limiters/redis/slidingWindowCounter';

type Policy = { name: string; limit: number; windowMs: number; identity: (req: Request) => string };

export function rateLimit(redis: Redis, policy: Policy) {
  return async (req: Request, res: Response, next: NextFunction) => {
    const id = policy.identity(req);
    const key = `${policy.name}:${id}`;

    try {
      const { allowed, remaining } = await slidingWindowCounterRedis(
        redis, key, policy.limit, policy.windowMs,
      );

      res.setHeader('RateLimit-Limit', String(policy.limit));
      res.setHeader('RateLimit-Remaining', String(remaining));
      res.setHeader('RateLimit-Policy', `${policy.limit};w=${Math.floor(policy.windowMs / 1000)}`);

      if (!allowed) {
        res.setHeader('Retry-After', String(Math.ceil(policy.windowMs / 1000)));
        return res.status(429).json({
          error: 'rate_limited',
          message: `Too many requests. Try again in ${Math.ceil(policy.windowMs / 1000)}s.`,
        });
      }

      return next();
    } catch (err) {
      // Fail open - see "Fail open or fail closed" below
      req.log?.warn({ err }, 'rate limiter unavailable, allowing request');
      return next();
    }
  };
}
Usage:
import express from 'express';
import { rateLimit } from './middleware/rateLimit';

const app = express();

const ipOf = (req) => req.ip;
const userOf = (req) => req.user?.id ?? `ip:${req.ip}`;

app.post('/login', rateLimit(redis, {
  name: 'login',
  limit: 10,
  windowMs: 5 * 60_000,
  identity: ipOf,
}), loginHandler);

app.use('/api', rateLimit(redis, {
  name: 'api',
  limit: 600,
  windowMs: 60_000,
  identity: userOf,
}));
Two policies, completely separate budgets. The login policy is tight and IP-keyed because the request hasn't authenticated yet; the API policy is generous and user-keyed because the request has.
The headers callers actually look at
The IETF draft for rate-limit headers (RateLimit-Limit, RateLimit-Remaining, RateLimit-Reset, RateLimit-Policy) is the modern standard. The older X-RateLimit-* versions are everywhere too - many SDKs still parse them - so emitting both is a safe transitional approach.
The header that matters most when a client gets a 429 is Retry-After. It can be a number of seconds or an HTTP date. A well-behaved client uses it to back off; without it, clients tend to retry immediately and turn a small spike into a sustained one. Set it on every 429 you return, even if the value is approximate.
A few rules that save you a support ticket later:
- Never emit a 429 without
Retry-After. - Don't lie about
RateLimit-Remaining. If your sliding window counter says 12, send 12. - Don't expose internal counter keys or bucket IDs in headers. They're an information leak.
- If you have a per-tenant budget and a per-user budget, the response headers should describe the one that actually limited the request - or send both with a
RateLimit-Policyname to disambiguate.
Getting the identity right
This is where most production rate limiters silently fail.
Trusting client IP
Behind any load balancer or CDN, req.ip will be the proxy's IP unless you tell Node about the proxy. In Express:
app.set('trust proxy', 1); // trust the immediate proxyThe 1 is important. true blindly trusts every IP in X-Forwarded-For, which means a caller can spoof their IP by sending the header themselves and bypass your IP-keyed limiter entirely. Set it to the number of trusted proxies you actually have (usually 1 for a cloud load balancer), or to a specific subnet:
app.set('trust proxy', ['10.0.0.0/8']); // only trust hops inside the VPCTest this. The fastest way to confirm you got it wrong is to send a request with X-Forwarded-For: 1.2.3.4 and see whether your logs report the request as coming from 1.2.3.4. If they do and you didn't intend to trust public hops, fix it before shipping.
Carrier-grade NAT and IPv6
A single mobile carrier IP can represent thousands of users. A single IPv6 /64 prefix represents a single residential customer, but a /128 might be a different device behind the same router. For per-IP limits, treat IPv6 as a /64 prefix, not as a full address:
import { Address6 } from 'ip-address';

export function ipKey(ip: string) {
  if (ip.includes(':')) {
    try {
      return new Address6(ip).startAddress().correctForm().split(':').slice(0, 4).join(':') + '::/64';
    } catch {
      return ip;
    }
  }
  return ip;
}
This single change has stopped more than one incident where an attacker rotated IPv6 addresses inside their assigned prefix to defeat a per-address limiter.
The pre-auth dilemma
For unauthenticated endpoints - /login, /signup, /forgot-password - you only have the IP. Limiting too aggressively breaks shared networks; limiting too loosely makes credential stuffing trivial. The pattern that works:
- A generous first-line IP cap that catches obvious flooders (say, 60/min on
/login). - A stricter per-IP-per-username cap that catches credential stuffing (say, 5 attempts per 15 minutes per
ip + usernamepair). - A per-username cap independent of IP that catches distributed attacks (say, 20 failures per hour per username, after which you require a CAPTCHA or step-up).
Three small limiters, each cheap. Together they handle the realistic threat model without locking out a coffee shop.
Fail open or fail closed
When Redis is unavailable, what does your limiter do?
Fail open means "if I can't check, allow the request." It's the right default for most public APIs - degraded rate limiting is better than degraded availability. Log every fail-open as a warning and alert on the rate of them.
Fail closed means "if I can't check, deny the request." It's the right default for routes where the limit is the security control - /login, payment endpoints, anything where exceeding the limit causes real damage. A 503 here is correct; allowing unlimited requests is not.
Be deliberate about which routes are which, and write it down. The wrong default has caused both public outages and security incidents.
What about express-rate-limit and friends?
You usually don't need to write this yourself. The Node ecosystem has solid options:
express-rate-limitwithrate-limit-redis- the most common Express middleware. Fixed-window by default, well-tested, easy to configure per-route. Fine for most APIs.rate-limiter-flexible- supports fixed window, token bucket, leaky bucket; backends for Redis, MongoDB, MySQL, Postgres, and in-memory. The most algorithmically complete option.@upstash/ratelimit- built for Upstash Redis (REST API), useful in edge environments like Cloudflare Workers and Vercel Edge where TCP-based Redis clients can't run.fastify-rate-limit- official Fastify plugin, sliding-window backed, with hooks for per-route customisation.redis-cell- Redis module that adds a single atomicCL.THROTTLEcommand implementing the GCRA (Generic Cell Rate Algorithm, equivalent to a token bucket). Zero glue code on the application side.
The reason to roll your own is usually one of: you need a custom algorithm, you need to share state with a non-Node service, or you want every request to go through Lua you control. For everything else, reach for one of these.
Abuse prevention beyond simple counts
A pure rate limiter caps how fast someone can hit you. Abuse prevention is a broader concept - it shapes what you do when someone is hitting you in a suspicious pattern.
A few patterns worth layering on top:
- Progressive delays. Instead of jumping from 200 OK to 429, insert artificial latency once a client crosses 80% of its budget. The honest clients won't notice; the abusive ones get throttled into the ground without realising it's deliberate.
- Adaptive limits. Tighten the limit automatically when error rates from a key spike. A client whose 4xx rate jumps to 90% is almost certainly probing - drop their budget to 10% of normal until the error rate recovers.
- Reputation buckets. Store a small reputation score per identity. Successful, well-formed requests raise it; failed auth, malformed bodies, and 4xxs lower it. Use the score to pick which rate-limit policy applies. Brand-new keys get the strict policy; long-trusted ones get the relaxed one.
- Per-endpoint cost weights. Not every request is equal. A
GET /api/productsmight cost 1 token; aPOST /api/reports/generatemight cost 50. Let endpoints declare their cost and have the limiter consume that many tokens. Token bucket makes this trivial; fixed window makes it awkward. - Step-up challenges. When a per-username limiter on
/logintrips, switch the next request to require a CAPTCHA or an emailed magic link rather than returning 429 forever. Returning 429 to a real user who forgot their password is a worse experience than a CAPTCHA they can solve. - Bot signals. TLS fingerprints, header ordering, missing
Accept-Encoding, and timing patterns are all cheap signals that a request is from a script. Couple them with rate limits - a fingerprint that looks scripted gets a stricter bucket without you having to identify the user.
None of these are rate limits in the strict sense, but in production they're usually wired into the same pipeline. The rate limiter is the cheapest enforcement point you have, and it's the natural place to apply these decisions.
What the user sees
When you 429 someone, you've made a UX decision. The default response is technically correct and deeply unhelpful:
{ "error": "Too Many Requests" }A 429 that actually helps tells the caller three things: which limit they hit, when they can try again, and what to do if they think it's wrong. For an authenticated SaaS API, that might look like:
{
  "error": "rate_limited",
  "message": "You've hit the per-minute write limit for this workspace.",
  "policy": "workspace:write",
  "limit": 60,
  "windowSeconds": 60,
  "retryAfterSeconds": 23,
  "docs": "https://docs.example.com/api/rate-limits"
}
For a user-facing form (login, signup), it's almost always a worse experience to surface a 429 directly. The right move is to switch into a step-up flow - show a CAPTCHA, send a verification email, or display a clear "too many attempts, try again in 5 minutes" message - instead of returning a raw JSON error.
Observability you'll be glad you added
Three signals are enough to keep rate limiting healthy:
- Allowed / denied counts per policy. A spike in denies on
/loginis an attack. A spike in denies on/api/productsis probably a customer's cron job that needs a phone call. - Top-N denied identities per minute. If the same key shows up at the top of this list for an hour, you have an incident, not a one-off.
- Limiter latency. A rate limiter that adds 50 ms instead of 1 ms because Redis is overloaded will tank your p95 before anything else. Track it.
Wire these into the same dashboard your oncall already looks at. The first time you get paged for a real attack, the limiter is where you'll want to start looking.
A small checklist before shipping
Before merging a rate-limiting change to production, walk through these:
- Is the limit per-IP, per-user, per-tenant, or some combination - and is that the right answer for this route?
- Is
trust proxyconfigured correctly soreq.ipis the real client? - Do you treat IPv6 as a
/64prefix, not a full address? - Does the limiter fail open or fail closed when Redis is down - and is that the right default for this route?
- Are you returning
Retry-Afterand theRateLimit-*headers on 429s? - Have you tested with a small script that the limit actually triggers at the count you expect?
- Have you added a dashboard for allowed/denied counts and limiter latency?
- For auth endpoints, do you have a per-user limiter independent of IP?
The first time you have to fix any of these in an incident, you'll wish you'd checked them at code review. The list is short enough to be worth running through.
Rate limiting isn't glamorous. It's mostly counters and small expirations and tedious header work. But it's the single thing that decides whether a bad Sunday is a non-event or a postmortem - and if you've never had to write one of those at 3 a.m. about an endpoint with no limiter, take this as a quiet hint to wire one in before you have to.