So, you've been running docker compose up for two years and it just works. Until the day it doesn't.
A teammate adds a new service and now the build takes eight minutes instead of forty seconds. Your container can't reach the database even though they're in the same docker-compose.yml. Your migrations ran, but the data is gone after docker compose down. The image is 1.4 GB and you have no idea why.
Welcome to the part of Docker the tutorials skip.
The truth is that Docker is genuinely simple. There are maybe five concepts under the whole thing, and once you've got them, everything you'll ever do with Docker stops feeling like magic. This article is the tour I wish I'd had before I spent a weekend trying to figure out why my Postgres data kept disappearing.
We'll cover images and the layer cache, volumes and bind mounts, the network model, and the Compose file that wires it all together. By the end you should be able to read a Dockerfile and a docker-compose.yml the way you read regular code, knowing exactly what each line costs and why.
The mental model: containers are processes, not VMs
Before any of the configuration, get this part right.
A container is not a tiny virtual machine. It's a regular Linux process running on your host kernel, but with a few namespaces and cgroups around it that make it think it has its own filesystem, its own network, its own process tree. There's no second OS in there. There's no hypervisor. The container's init process is just bash (or your app) running as PID 1, isolated by namespaces.
That's why containers start in milliseconds while VMs take seconds. That's why a container's memory footprint is just your app's memory plus a sliver, instead of an entire OS. That's also why containers share a kernel with the host, and why you can't run a Linux container on Windows without a Linux VM hiding underneath (which is what Docker Desktop does).
VM model:                          Container model:
┌─────────────┐ ┌─────────────┐    ┌─────────┐ ┌─────────┐ ┌─────────┐
│  App + OS   │ │  App + OS   │    │   App   │ │   App   │ │   App   │
├─────────────┤ ├─────────────┤    ├─────────┴─┴─────────┴─┴─────────┤
│ Hypervisor                  │    │       Shared host kernel          │
├─────────────────────────────┤    ├───────────────────────────────────┤
│ Host OS                     │    │ Host OS                           │
└─────────────────────────────┘    └───────────────────────────────────┘
Once you internalise "a container is a process," the rest of Docker stops feeling exotic. docker exec is just running a new process in an existing namespace. docker logs is just reading what the process wrote to stdout. docker stop sends a SIGTERM. Nothing weird happens.
Images: the recipe and the snapshot
A Docker image is a read-only filesystem snapshot plus a bit of metadata about how to run it (default command, environment variables, exposed ports). A container is what you get when Docker takes that image, adds a thin writable layer on top, and starts a process inside it.
You build an image with a Dockerfile, a text file describing, instruction by instruction, how to assemble that snapshot. The smallest useful one for a Node app:
FROM node:20-alpine
WORKDIR /app
COPY package.json package-lock.json ./
RUN npm ci --omit=dev
COPY . .
EXPOSE 3000
CMD ["node", "server.js"]
Each non-trivial instruction creates a new layer. We'll get to why that matters in a minute. For now, the part to notice is that this is a recipe, not the result. When you run docker build -t my-api ., Docker walks the file top to bottom, executes each instruction, and saves the resulting snapshot under the tag my-api.
The same idea in Python:
FROM python:3.12-slim
WORKDIR /app
COPY requirements.txt .
RUN pip install --no-cache-dir -r requirements.txt
COPY . .
EXPOSE 8000
CMD ["uvicorn", "app:app", "--host", "0.0.0.0", "--port", "8000"]
And in Go, where you almost always want a multi-stage build:
# Build stage
FROM golang:1.22-alpine AS build
WORKDIR /src
COPY go.mod go.sum ./
RUN go mod download
COPY . .
RUN CGO_ENABLED=0 go build -o /out/api ./cmd/api

# Runtime stage
FROM gcr.io/distroless/static-debian12
COPY --from=build /out/api /api
EXPOSE 8080
ENTRYPOINT ["/api"]
That second example is doing a lot. The build stage has the full Go toolchain (~300 MB). The runtime stage only contains the compiled binary on top of distroless/static, which has no shell, no package manager, almost nothing. The final image is often under 20 MB. Multi-stage builds are how you stop shipping your build tools to production.
What to actually understand about images
Tags are not versions. A tag like node:20-alpine is a pointer that Docker Hub can re-point at any time. Today it might mean Node 20.11.1 on Alpine 3.19; next week it might mean 20.12.0 on Alpine 3.20. For local development this is fine. For production, pin to a digest:
FROM node:20-alpine@sha256:7e227295e96f5b00aa79555ae166f50610940d888fc2e321cf36304cbd17d7d6The digest is the immutable content hash. The tag can drift. The digest can't.
Choose a base image deliberately. node:20 is ~1.1 GB because it's based on full Debian. node:20-slim is ~250 MB. node:20-alpine is ~150 MB and uses musl libc instead of glibc, which occasionally breaks native modules. gcr.io/distroless/nodejs20 has no shell. Each comes with tradeoffs. Pick on purpose, not by copy-pasting from the first Stack Overflow answer.
COPY is not ADD. They look similar. ADD will also unpack tarballs and download URLs, which sounds convenient until you realise it's a footgun every time. Use COPY for files. Use RUN curl ... if you need to download something, at least then it's visible in the layer history.
ENTRYPOINT and CMD are different. CMD is the default command, easily overridden when you docker run image other-command. ENTRYPOINT is the always-runs prefix, and CMD becomes its arguments. For a CLI tool you want ENTRYPOINT ["mytool"]. For a long-running server, CMD alone is usually enough.
Layers: the cache that makes everything fast (or slow)
Here's the part that catches everyone out, sooner or later.
Every instruction in your Dockerfile creates a layer, a content-addressable, read-only filesystem diff. Layers stack on top of each other, and the final image is the union of all of them. When Docker runs a container, it slaps a thin writable layer on top, and any changes the container makes go there.
The killer feature is the build cache. When you rebuild an image, Docker walks the Dockerfile from the top, and for each instruction it asks: "do I have a cached layer for this exact instruction with this exact input?" If yes, it reuses the layer. If no, it executes the instruction and invalidates every cache below it.
That last clause is the one that matters. Once one layer changes, every layer below has to be rebuilt. This is why the order of your Dockerfile is the difference between a 5-second rebuild and a 5-minute rebuild.
Look at this Dockerfile:
FROM node:20-alpine
WORKDIR /app
COPY . .
RUN npm ci --omit=dev
EXPOSE 3000
CMD ["node", "server.js"]
Every time anything in your repo changes (a comment in a test file, a typo in the README), COPY . . invalidates the cache, and npm ci runs again. Even though package.json didn't change. Even though your dependencies are identical to last time.
Now look at the same thing reordered:
FROM node:20-alpine
WORKDIR /app
COPY package.json package-lock.json ./
RUN npm ci --omit=dev
COPY . .
EXPOSE 3000
CMD ["node", "server.js"]
Now npm ci runs only when package.json or package-lock.json actually change. The COPY . . step runs on every code change, but it's just copying files, fast and cheap. Same final image, completely different feedback loop.
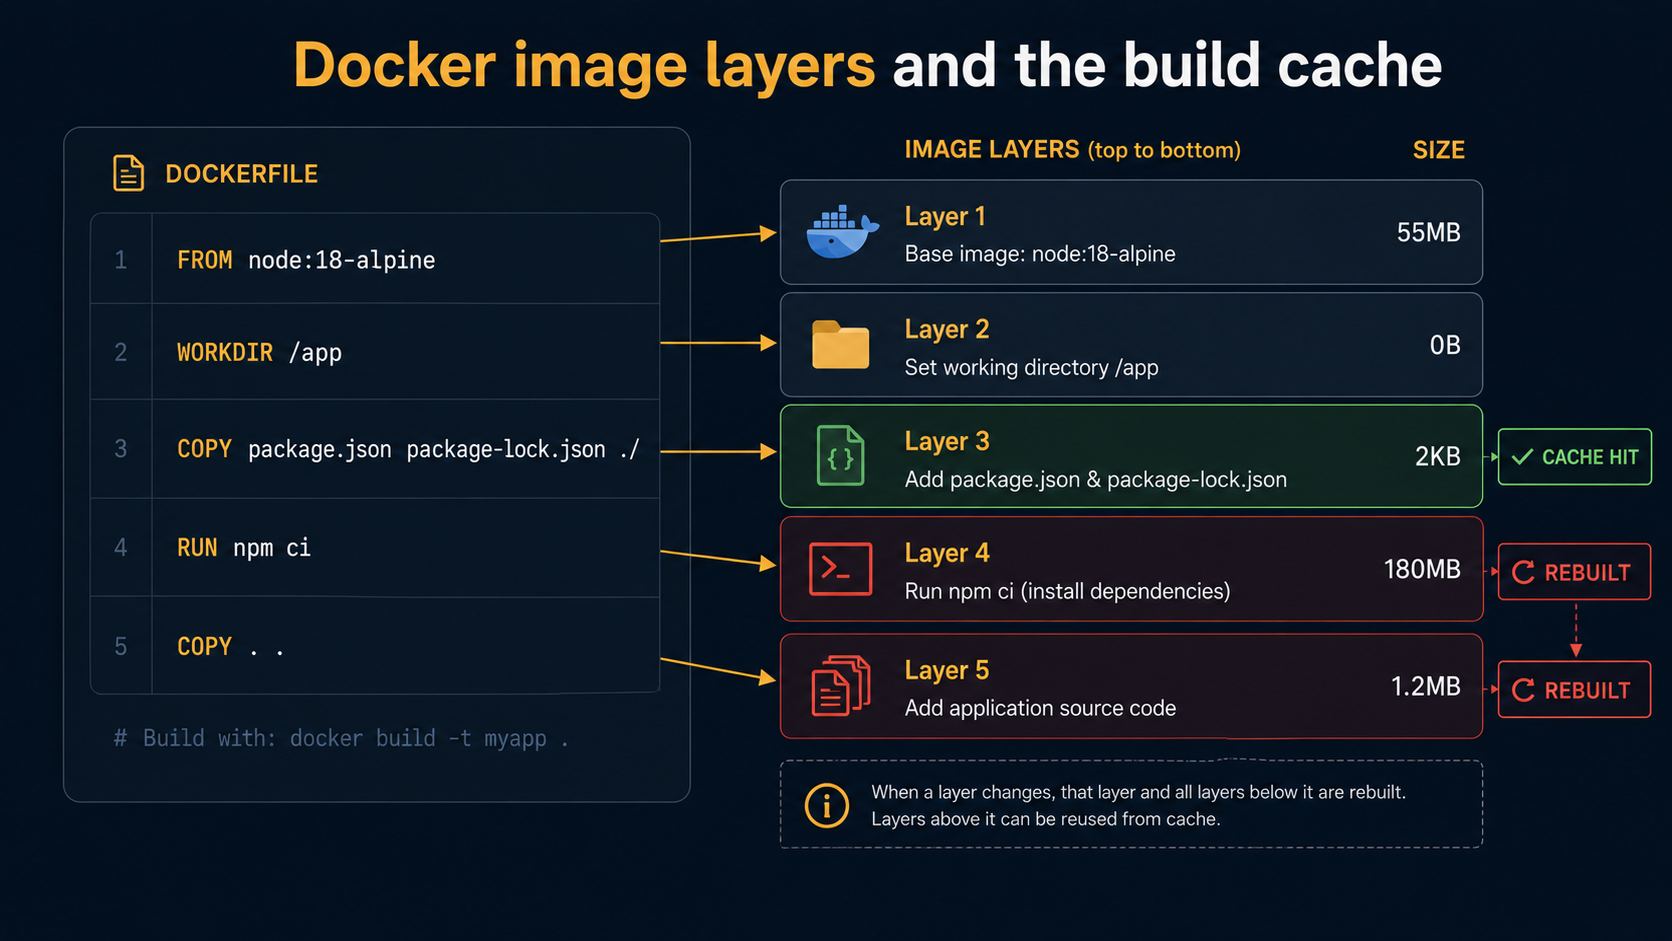
The general rule: put things that change rarely at the top, things that change often at the bottom. Base image (rarely). System packages (rarely). Dependency manifests (sometimes). Dependency install (cached when manifests don't change). Source code (often). That order gives you the maximum amount of cache reuse for the minimum amount of pain.
What to actually understand about layers
Each layer adds size, and you can't undo a layer. If you do RUN apt-get install -y build-essential && make stuff && apt-get remove -y build-essential in separate RUN instructions, the build tools are gone in the final image's contents but still present in the previous layer. Each layer is permanent. The fix is to do it in one RUN:
RUN apt-get update \
 && apt-get install -y --no-install-recommends build-essential \
 && make stuff \
 && apt-get purge -y build-essential \
 && rm -rf /var/lib/apt/lists/*
Or, better, use a multi-stage build and only copy the final artifact into the runtime image.
.dockerignore is not optional. Without it, COPY . . will pull in your node_modules, your .git directory, your local .env file, your IDE caches, your build artifacts. The image grows. The build slows. Sometimes you ship secrets you didn't mean to.
.git
node_modules
.env*
.next
dist
coverage
*.log
.DS_Store
BuildKit changes everything. Modern Docker uses BuildKit by default (since Docker 23). It runs build steps in parallel where possible, supports cache mounts (RUN --mount=type=cache,target=/root/.npm npm ci), supports build secrets without baking them into layers (RUN --mount=type=secret,id=npmrc ...), and gives you much better error output. If you're stuck on an old Docker, upgrade. The build experience is dramatically better.
Image inspection is your debugger. When an image is mysteriously huge, docker history my-api shows you every layer with its size. That's how you find the 800 MB layer that's somehow RUN apt-get install installing the entire X11 stack because of a transitive dependency. dive (a third-party tool) goes further and shows you exactly which files each layer added.
Volumes: where your data actually lives
Now the question that breaks everyone the first time: "why did all my data disappear?"
A container's writable layer is ephemeral. When the container is removed, the writable layer goes with it. Your Postgres data, your uploaded files, your node_modules you carefully npm installed inside the container, all gone. Not corrupted, not somewhere on disk you can recover, just gone.
Docker has three ways to make data persist beyond a single container's life: volumes, bind mounts, and tmpfs mounts. They look similar in commands and behave very differently.
# Named volume — Docker manages where on disk it lives
docker run -v pgdata:/var/lib/postgresql/data postgres:16

# Bind mount — explicit path on the host
docker run -v /Users/me/code/app:/app node:20-alpine

# tmpfs — in-memory, never touches disk
docker run --tmpfs /tmp ubuntu:22.04
A named volume is a directory Docker manages somewhere on the host (on Linux, usually /var/lib/docker/volumes/<name>/_data). You don't care where. You just refer to it by name. Volumes survive container restarts and removals, you can list them with docker volume ls, and you can mount the same volume into multiple containers.
A bind mount is a specific path on your host filesystem mapped into the container. This is what you use during development to live-reload code: you bind-mount your project directory into the container, and edits on your host appear instantly inside the container. In production, bind mounts are usually a smell (they tie the container to a specific host filesystem layout).
A tmpfs mount is in-memory storage that never hits disk. It's gone when the container stops. Useful for sensitive data you don't want persisted, or for caches where speed matters more than durability.
What to actually understand about volumes
Always volume-mount stateful directories. Postgres data goes into /var/lib/postgresql/data. MySQL data goes into /var/lib/mysql. Redis AOF goes into /data. If you run a stateful container without a volume on those paths, you're one docker rm away from losing everything. The official images make this explicit in their VOLUME instruction, but Docker won't force you to mount one. It'll just create an anonymous volume that's easy to lose track of.
Bind mounts on Mac and Windows are slow. Docker Desktop runs Linux in a tiny VM under the hood, and the host's filesystem is shared into the VM via a translation layer (gRPC FUSE, virtiofs, depending on settings). For small files this is fine. For something like node_modules with tens of thousands of tiny files, it's painful. Two common workarounds: (1) keep node_modules inside a named volume rather than the bind-mounted source, (2) run the dev container with the source mounted as :cached or :delegated to relax consistency guarantees.
services:
  api:
    image: node:20-alpine
    volumes:
      - .:/app:cached          # source from host, slightly relaxed consistency
      - node_modules:/app/node_modules  # node_modules in a named volume — fast
volumes:
  node_modules:
Anonymous volumes are how you lose track. If you do docker run -v /var/lib/postgresql/data postgres:16 (no name on the left), Docker creates a volume with a random hash name and mounts it. Your data is in there somewhere. Find it later with docker volume ls. There's a screenful of 8a3f... and c2d1... that you have no way to identify. Always name your volumes.
docker compose down -v deletes volumes. Without -v, your named volumes stick around between Compose runs, which is what you want for a dev database. With -v, they're wiped. People reach for -v to "reset everything" and then wonder why a teammate's seed data is gone. Know which one you're typing.
Volumes are not backups. A named volume on your laptop's disk is exactly as durable as your laptop's disk. If you care about the data, snapshot it (docker run --rm -v pgdata:/data -v $(pwd):/backup alpine tar czf /backup/pg.tar.gz /data) or, better, run a real pg_dump against the database and store the dump somewhere safe.
Networks: how containers find each other
The last big concept. Docker containers run in their own network namespaces, which means by default they can't see anything outside themselves. Docker fixes that by giving them virtual networks they can join.
There are several network drivers, but in day-to-day work you'll mostly see three:
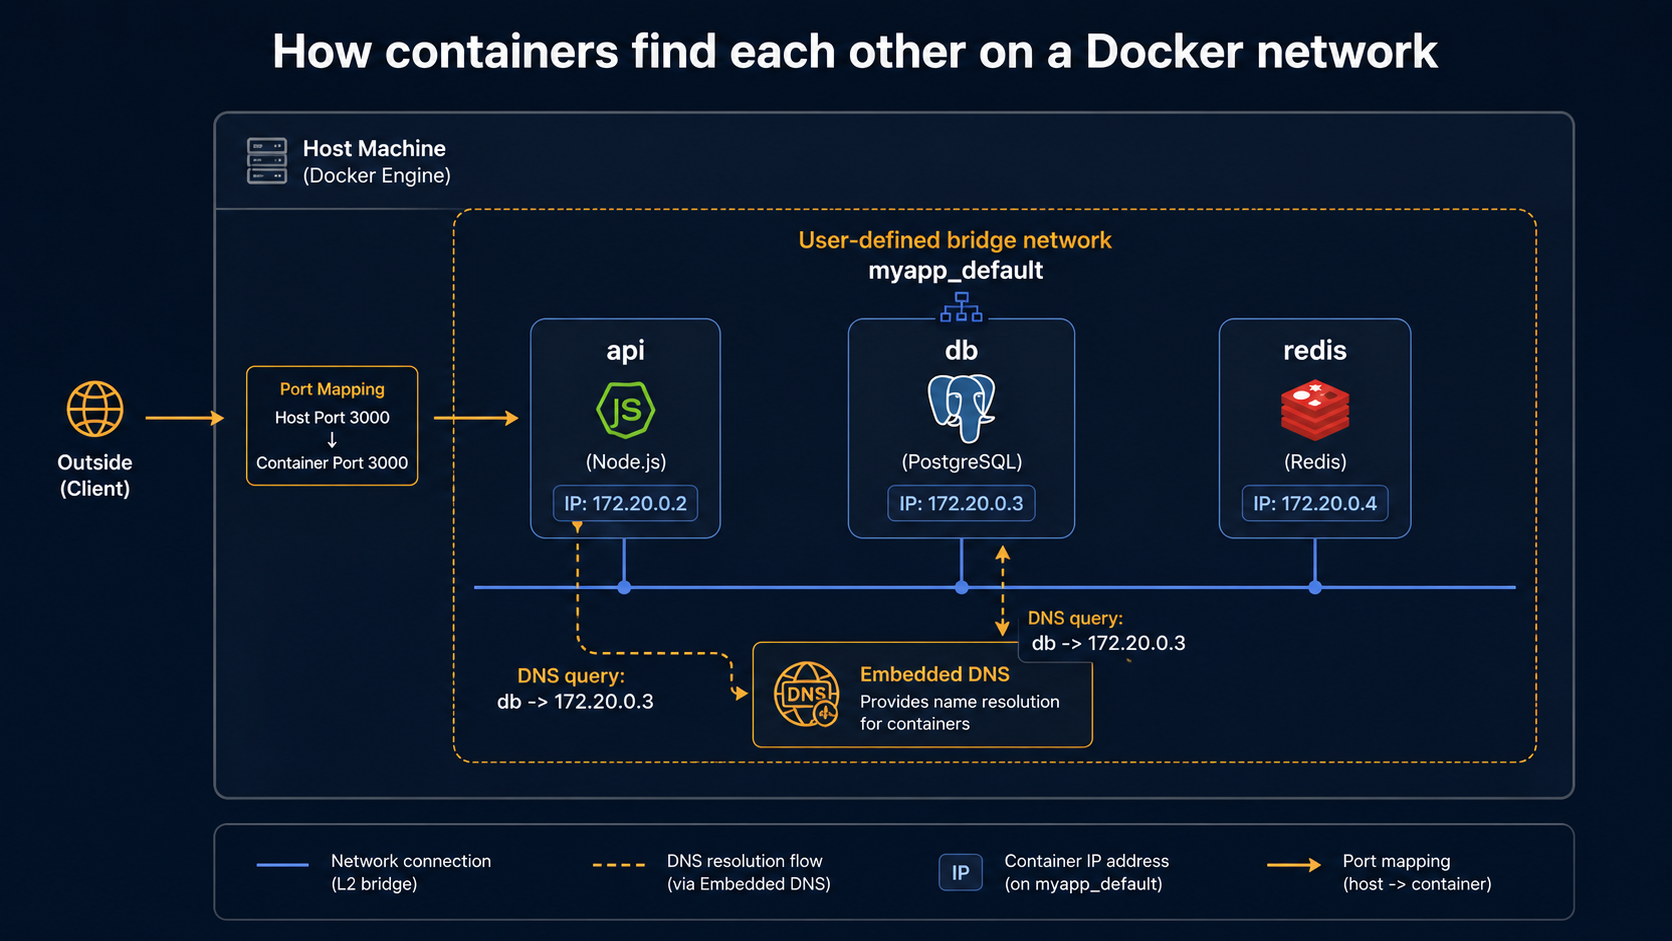
Bridge is the default. When Docker installs, it creates a virtual bridge interface called docker0 on your host. Every container on the default bridge gets an IP on a private subnet (typically 172.17.0.0/16), and they can all reach each other and the outside world via NAT through the host. The default bridge is fine for one-off containers, but it has a quirk: containers on the default bridge can only reach each other by IP, not by name.
User-defined bridges fix that. If you create your own bridge network with docker network create mynet and run containers with --network mynet, Docker runs an embedded DNS server that resolves container names to IPs automatically. This is why you can write host: "db" in your app's config inside a Compose file. Compose creates a user-defined bridge for your project and DNS just works.
Host removes the network namespace entirely: the container shares the host's network interfaces directly. No NAT, no bridge, no port mapping. It's the fastest network mode and usually the wrong one for backend apps because it removes most of the isolation that made you reach for containers in the first place. Useful for low-latency network appliances and some monitoring agents.
# Default bridge — containers can ping by IP only
docker run -d --name web nginx
docker run -d --name app curlimages/curl sleep 3600
docker exec app curl web        # FAILS — no DNS on the default bridge
docker exec app curl 172.17.0.2 # works if that's web's IP

# User-defined bridge — DNS works
docker network create mynet
docker run -d --name web --network mynet nginx
docker run -d --name app --network mynet curlimages/curl sleep 3600
docker exec app curl web        # works — "web" resolves to its container IP
That second pattern (give the network a name, give each container a name, talk between them by name) is the entire networking model of Docker Compose. Compose is doing this for you under the hood every time.
What to actually understand about networks
Port publishing is one-way. When you run docker run -p 8080:80 nginx, you're telling Docker "map host port 8080 to container port 80." That's needed for traffic from your laptop or the internet to reach the container. It is not needed for containers on the same network to talk to each other. They always reach each other on the container's internal port. Don't -p 5432:5432 your dev Postgres unless you actually want to connect from the host. Otherwise you've just exposed a database to anyone who can hit your machine.
localhost inside a container means the container itself. This trips up everyone exactly once. If your app inside container A tries to connect to localhost:5432, it's looking inside container A, not at the host and definitely not at container B. Use the other container's name (db:5432) or, on Docker Desktop, use the special hostname host.docker.internal to mean "the host machine."
Compose creates one network per project. When you docker compose up, Compose creates a network named <project>_default and attaches every service to it. Services reach each other by service name. You don't have to declare anything for this to work. You only need to define networks explicitly when you want multiple isolated networks (e.g., a frontend network and a backend network where only some services touch both).
The network is the security boundary you actually have. A container with no port published and no shared network with the outside world is genuinely isolated from external traffic. A container on the host network has the full attack surface of the host. Most production breaches involving Docker happen because someone published a port (or used host networking) and then forgot it was there.
Compose: the file that ties it all together
You've now got every piece. docker-compose.yml is just the config file that wires them up declaratively, so your team doesn't have to remember which combination of docker run -v ... -p ... --network ... --env-file ... flags to type.
A realistic dev docker-compose.yml for a backend with a database and a cache:
services:
  api:
    build: .
    ports:
      - "3000:3000"
    environment:
      DATABASE_URL: postgres://app:app@db:5432/app
      REDIS_URL: redis://cache:6379
    volumes:
      - .:/app:cached
      - node_modules:/app/node_modules
    depends_on:
      db:
        condition: service_healthy
      cache:
        condition: service_started
    develop:
      watch:
        - action: sync
          path: ./src
          target: /app/src

  db:
    image: postgres:16-alpine
    environment:
      POSTGRES_USER: app
      POSTGRES_PASSWORD: app
      POSTGRES_DB: app
    volumes:
      - pgdata:/var/lib/postgresql/data
    healthcheck:
      test: ["CMD-SHELL", "pg_isready -U app"]
      interval: 5s
      timeout: 3s
      retries: 5

  cache:
    image: redis:7-alpine
    volumes:
      - redisdata:/data

volumes:
  pgdata:
  node_modules:
  redisdata:
Read it slowly. Every concept from the rest of this article is in there. The api service builds an image from the Dockerfile in the current directory and exposes port 3000 to the host. The database URL points to db because Compose's user-defined network resolves service names. pgdata is a named volume so the database survives docker compose down. The node_modules named volume keeps the bind-mount from murdering performance on Mac and Windows. depends_on with condition: service_healthy means the API doesn't start until the database actually responds to pg_isready, not just until the container has started.
That's a complete dev environment for an entire backend in 35 lines.
What to actually understand about Compose
depends_on without a condition is almost useless. The default depends_on only waits for the container to start, not for the service inside to be ready. Your API will boot, try to connect to a database that's still initialising, and crash. Use condition: service_healthy and define a healthcheck on the dependency, or write a small wait-loop in your container's entrypoint.
Environment variables, env files, and .env are different things. environment: in the Compose file sets vars inside the container. An env_file: reference loads vars from a file into the container. A .env file in the same directory as the Compose file is loaded by Compose itself for variable substitution in the YAML (${POSTGRES_PASSWORD} style). Same syntax, different scopes. Read errors carefully when something isn't being set. Usually you've put the value in the wrong layer.
docker compose up --build versus docker compose up. Without --build, Compose only builds the image if it doesn't exist. If you change the Dockerfile or package.json and run docker compose up, you get the old image. Add --build (or run docker compose build separately) to force a rebuild.
Profiles are how you avoid two Compose files. You probably have services that aren't always needed: a worker, a background job runner, a Mailhog, a one-off seeder. Mark them with profiles: ["worker"] and they won't start by default. docker compose --profile worker up includes them. One file, multiple workflows.
docker compose (with a space) is the V2 plugin. docker-compose (with a dash) is V1, written in Python, deprecated since 2023, removed from Docker Desktop. They're mostly compatible but flags drift. New writing should use V2.
A few production-shaped notes before you go
This article is mostly about understanding Docker as a backend developer. Production deployment of containers is a much larger topic: Kubernetes, ECS, Nomad, Fly, Railway, plain old systemd + docker run, all valid choices depending on scale and team. But a few things from the dev side translate directly, and you should know them before you ship anything serious.
Run as a non-root user. By default, processes inside a container run as root. If an attacker breaks out of your app, they get root inside the container, and depending on the kernel and configuration, possibly more. Add a non-root user in the Dockerfile and USER to it before CMD:
RUN addgroup -S app && adduser -S app -G app
USER app
CMD ["node", "server.js"]
Healthchecks earn their keep in production. A HEALTHCHECK in your Dockerfile (or healthcheck: in Compose) lets the orchestrator know whether the container is actually serving traffic, not just running. docker ps will show "(healthy)" or "(unhealthy)" next to the status. Kubernetes and ECS both use this to decide when to route traffic and when to restart.
Handle SIGTERM properly. When the orchestrator wants to stop your container, it sends SIGTERM, waits a configurable grace period (10 seconds by default), then sends SIGKILL. If your app doesn't trap SIGTERM and shut down cleanly (drain in-flight requests, close database connections, flush buffers), you'll lose requests on every deploy. Most modern frameworks do this for you. Some don't. Check yours.
Don't run multiple processes in one container. The "one process per container" rule is the official guidance for a reason. If you need a worker and a web server, run two containers. If you really need a side process (a log collector, a sidecar proxy), use the orchestrator's primitives: Pods in Kubernetes, sidecars in ECS. Squashing two processes into one container with supervisord works on day one and creates a debugging nightmare on day fifty.
Image scanning is a thirty-second habit. docker scout cves my-image:latest (or Trivy, or Snyk, or whatever your platform uses) shows known vulnerabilities in your image's layers. Run it locally before pushing. Wire it into CI. Most CVEs in your image will be in the base layer, not your code. That's a great argument for choosing a small, well-maintained base image and updating it regularly.
That's most of what makes Docker tractable. Five concepts: process isolation, images and layers, the build cache, volumes, networks. One config file that wires them up. A handful of habits: pin digests, name your volumes, order your Dockerfile for cache, expose only the ports you need, run as non-root.
The next time docker compose up does something surprising, you've got the model to debug it instead of just retrying.