
So, you've got a Go service in production. It mostly behaves. Then one Friday afternoon the p99 latency chart tilts up and to the right, the SRE channel lights up, and somebody asks you the question every backend engineer eventually hears: "so what's it actually doing?" You squint at the metrics dashboard. CPU is up, but that's a symptom, not a cause. Memory is climbing. Goroutine count is doing something weird. You have a lot of charts and zero answers.
This is the moment pprof exists for. Go ships with one of the best profilers in any mainstream language, built into the runtime, free at runtime cost, and accessible through a single import. Most Go developers know it exists. Far fewer know it well. The gap between "I've heard of pprof" and "I can open a profile and find the cause in five minutes" is huge, and it's mostly muscle memory you can build in an afternoon.
This article is the long version. We'll cover what pprof actually is, how to wire it up in a service and a benchmark, and then walk through the four profile types you'll reach for most: CPU, memory, goroutine, and block (plus its sibling, mutex). We'll talk about how to read them without falling for the obvious-but-wrong reading, and we'll close with continuous profiling and a few patterns for keeping pprof useful past the first incident.
Everything stays in Go. pprof is a Go-specific tool. There are pprof readers for other languages, but the runtime hooks we're using are Go's.
What pprof actually is
pprof is two things at once, which is part of what makes it confusing the first time.
The first is a runtime sampling mechanism inside the Go runtime. Every so often (configurable per profile type) the runtime grabs a stack trace and increments a counter. CPU profiles sample on a SIGPROF timer at 100Hz. Heap profiles sample on every Nth allocation byte. Goroutine profiles are instantaneous snapshots. Block and mutex profiles sample contention events. The output is a small, compact protobuf-encoded file describing "here are stacks, here's how often they were observed."
The second is a tool, go tool pprof, that reads those files and shows you the data. It has a terminal UI, an SVG flamegraph mode, an interactive web UI on a port of your choosing, and a half-dozen filter and display commands. Both halves are called "pprof," which is the kind of naming decision you get from runtime engineers.
The runtime-side hooks are exposed through two packages:
runtime/pprof: the low-level API.pprof.StartCPUProfile(w),pprof.Lookup("heap"),pprof.WriteHeapProfile(w), etc. You wire it directly into your program.net/http/pprof: a thin wrapper that registers HTTP handlers on/debug/pprof/*so you can grab profiles over the network. Side-effect import; the most common way services expose pprof.
You almost always want the HTTP version in services and the direct API in benchmarks or one-shot tools. Both produce the same kind of profile files.
Wiring it up in a service
The minimum viable pprof setup in a service is two lines:
import _ "net/http/pprof"

func main() {
    go func() {
        log.Println(http.ListenAndServe("localhost:6060", nil))
    }()
    // ... rest of the service
}
That side-effect import registers the pprof handlers on the default http.ServeMux, and the goroutine boots a small HTTP server on localhost:6060. Done. You now have CPU, heap, goroutine, block, mutex, allocs, and trace endpoints available.
A few practical notes that matter:
Bind to localhost, not 0.0.0.0. The pprof endpoints can expose stack traces and source paths; that's information you don't want a misconfigured load balancer to leak. In production, bind to loopback and access via SSH or a sidecar. If you want pprof over the public network, put it behind auth; Go gives you the handlers, not the authn.
Don't share the mux with your service. If you already use http.DefaultServeMux for your real API, the pprof handlers will get registered there too. That's almost never what you want. Use a dedicated mux:
mux := http.NewServeMux()
mux.HandleFunc("/debug/pprof/", pprof.Index)
mux.HandleFunc("/debug/pprof/cmdline", pprof.Cmdline)
mux.HandleFunc("/debug/pprof/profile", pprof.Profile)
mux.HandleFunc("/debug/pprof/symbol", pprof.Symbol)
mux.HandleFunc("/debug/pprof/trace", pprof.Trace)

go func() {
    log.Println(http.ListenAndServe("localhost:6060", mux))
}()
Same idea, explicit about which handlers exist.
Enable block and mutex profiles only when you want them. Both default to off because they have a non-zero overhead; every contention event would otherwise need to be sampled. Turn them on programmatically:
runtime.SetBlockProfileRate(1)      // sample every blocking event
runtime.SetMutexProfileFraction(1)  // sample every mutex contention
A rate of 1 is "sample everything," which is fine in dev and during an investigation. In steady-state production you'd use a higher rate (the value is, awkwardly, both a probability divisor for mutexes and a nanosecond threshold for blocking (more on that in a minute)).
Wiring it up in a benchmark or one-shot tool
For benchmarks, go test does it for you. Add the flags:
go test -bench=. -benchmem -cpuprofile=cpu.out -memprofile=mem.out ./mypkgYou get cpu.out and mem.out in the working directory, plus the standard -benchmem column on the benchmark output. Open them:
go tool pprof cpu.out
go tool pprof mem.out
For a one-shot command-line tool that you want to profile, embed the calls directly:
import "runtime/pprof"

func main() {
    f, err := os.Create("cpu.out")
    if err != nil {
        log.Fatal(err)
    }
    pprof.StartCPUProfile(f)
    defer pprof.StopCPUProfile()

    // do work

    mf, _ := os.Create("mem.out")
    defer mf.Close()
    runtime.GC() // get a clean view
    pprof.WriteHeapProfile(mf)
}
The runtime.GC() before writing the heap profile is a small but useful detail: it forces a collection so the inuse_* numbers reflect what's truly live rather than what was live plus a pile of unswept garbage.
The CPU profile
This is the one most people start with, and rightly so: when something is slow and you don't know why, CPU is usually the first lens.
How CPU sampling works in Go
The runtime sets up a SIGPROF timer at 100Hz. Every 10ms, the OS delivers a signal to a running thread; the Go runtime handler grabs the stack trace of whatever was on that thread at that moment. Over the course of a profile, you get a population of samples, each one a stack trace, each one weighted by how often it appeared.
That last point matters. A CPU profile shows you where your program spent on-CPU time. It does not show you wall-clock time. A goroutine that spent 90% of its life sleeping in a time.Sleep or blocked on a channel won't show up in a CPU profile; it wasn't running. We have other profiles for that (block, trace), but CPU is for CPU.
Grabbing a CPU profile
From a service:
# default duration: 30 seconds
go tool pprof http://localhost:6060/debug/pprof/profile

# explicit duration
go tool pprof http://localhost:6060/debug/pprof/profile?seconds=60
The command blocks for the duration, then drops you into the interactive prompt. If you want the raw file:
curl -o cpu.out "http://localhost:6060/debug/pprof/profile?seconds=60"
go tool pprof cpu.out
Saving the file is the better workflow. You can come back to it, compare it to a later one, share it with a colleague, or load it in the web UI without burning another minute of sampling.
Reading a CPU profile
Inside the pprof prompt, the moves you'll use 90% of the time:
(pprof) top                # top 10 by flat time
(pprof) top -cum           # top 10 by cumulative time (includes callees)
(pprof) top 20             # top 20
(pprof) list HandleRequest # source view of a specific function
(pprof) web                # SVG callgraph in your browser
(pprof) png > graph.png    # render to a file
(pprof) traces             # raw stack traces with counts
(pprof) peek HandleRequest # callers and callees of a function
top gives you something like:
Showing nodes accounting for 11.95s, 78.36% of 15.25s total
Dropped 134 nodes (cum <= 0.08s)
flat flat% sum% cum cum%
3.42s 22.43% 22.43% 3.42s 22.43% runtime.memmove
2.10s 13.77% 36.20% 4.18s 27.41% encoding/json.(*decodeState).object
1.55s 10.16% 46.36% 1.55s 10.16% runtime.scanobject
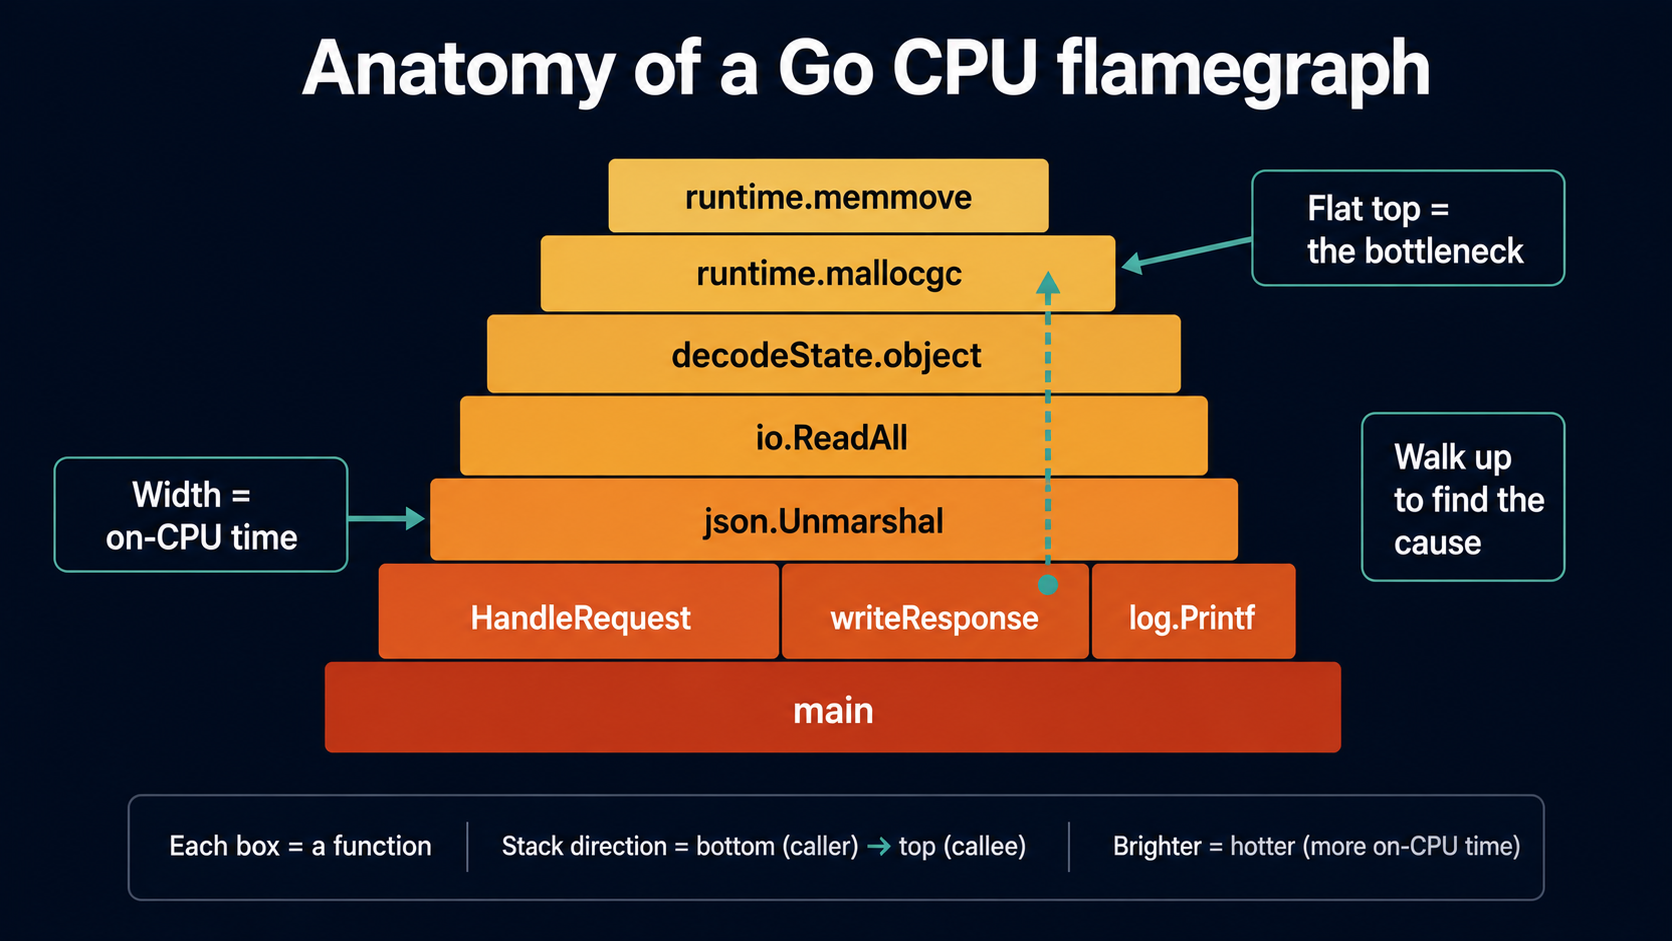
...Two columns matter. Flat is "time spent in this function's own code, not counting callees." Cum is "time spent in this function or anything it called." A function with high flat is doing real work itself. A function with high cum but low flat is mostly calling slow things.
The mistake to avoid: looking at the top of top and concluding the top entry is the problem. runtime.memmove and runtime.mallocgc show up at the top constantly. They're not your bug; they're being called by your bug. Use top -cum and walk up the chain.
The best command in pprof, in my opinion, is list. Given a function name, it shows you the function's source with allocation/CPU samples next to each line.
(pprof) list HandleRequest
Total: 15.25s
ROUTINE ======================== HandleRequest in /app/server.go
     150ms      4.18s (flat, cum) 27.41% of Total
         .          .     12:func HandleRequest(w http.ResponseWriter, r *http.Request) {
      50ms       50ms     13:    body, _ := io.ReadAll(r.Body)
         .          .     14:    defer r.Body.Close()
         .          .     15:
      30ms      3.50s     16:    var payload Request
      70ms      3.50s     17:    if err := json.Unmarshal(body, &payload); err != nil {
         .          .     18:        http.Error(w, err.Error(), 400)
         .          .     19:        return
         .          .     20:    }
      ...
You can see immediately that line 17 is doing the work: 3.5 seconds of cumulative time, all in json.Unmarshal. The numbers point at the line; you don't have to guess. This is the move when top got you to the right function but you need to know which line in it matters.
The web UI
go tool pprof has a built-in HTTP UI that's better than the terminal for browsing:
go tool pprof -http=:8080 cpu.outThis opens a browser to localhost:8080 with a graph view by default and tabs for Top, Source, Disassembly, Flame Graph, and Peek. The flame graph is where most people land: it shows the full call stack vertically (children stacked on parents) and the width of each box is proportional to time spent. Wide flat-topped boxes near the top are where you're burning CPU.
Two flame-graph reading tips:
- Click to zoom. The default view is the whole program; click any box to drill into just that subtree. This is the only sane way to read a deep callgraph.
- Use the search box. Type a function name (or a regex) and matching boxes highlight pink across the whole graph. Great for "where does this expensive function get called from?"
A practical CPU debugging workflow
The flow that works for me, every time:
- Capture a 30- or 60-second profile during the problematic window. Save it.
- Open the web UI. Look at the flame graph for shapes that surprise you: unexpectedly wide blocks, a function you didn't think was hot.
- Switch to Top, sort by cum, find the highest-cum function in your code (not runtime, not stdlib). Note its name.
listthat function. The line numbers will point at the actual offender.- Form a hypothesis. Make a change. Capture another profile. Use
pprof -base=before.out after.outto see the diff.
The diff move is the underused part. Reading two profiles independently is hard; reading the difference between them is easy. -base subtracts one from the other, so the top of the diff is what got worse and the bottom is what got better.
The heap profile
Memory is the second-most-common pprof use case. The heap profile answers two related but distinct questions: "what is allocating?" and "what is holding memory?"
Two questions, four profile types
net/http/pprof exposes two heap-shaped endpoints:
/debug/pprof/heap: currently-live heap (in-use objects and bytes)./debug/pprof/allocs: all allocations since the program started.
Either endpoint can be viewed under four "sample types" inside pprof:
inuse_objects: count of objects currently live.inuse_space: bytes currently live.alloc_objects: count of objects allocated since process start.alloc_space: bytes allocated since process start.
You pick which one to view with a flag:
go tool pprof -inuse_space  http://localhost:6060/debug/pprof/heap
go tool pprof -alloc_space  http://localhost:6060/debug/pprof/heap
go tool pprof -inuse_objects http://localhost:6060/debug/pprof/heap
go tool pprof -alloc_objects http://localhost:6060/debug/pprof/heap
Use alloc_* when investigating GC pressure and allocation hotspots: the things that create objects. Use inuse_* when investigating memory growth or leaks: the things that hold objects. They tell different stories with the same data.
A function that allocates a billion small short-lived objects will dominate alloc_* but barely register on inuse_*. A function that grabs a 100MB buffer once and keeps it forever will be invisible in alloc_* and dominate inuse_*. Pick the lens that matches the symptom.
Sample rate
The heap profile samples, by default, once per 512KB of allocation on average. The setting is the runtime.MemProfileRate variable:
import "runtime"

func main() {
    runtime.MemProfileRate = 1   // sample every allocation, debugging only
    // ...
}
A rate of 1 profiles every single allocation. It's expensive, so don't ship it, but it's the right setting when you're trying to find a small allocation that the default rate is missing. Set it back (or just don't override it) for production.
Heap profile workflow
A typical leak-hunt flow:
- Capture an
inuse_spaceheap profile when the service is "small." - Wait until the service has grown: minutes, hours, days, however long the leak takes.
- Capture another
inuse_spaceprofile. pprof -base=small.out big.outand look at the top.
The diff tells you what got bigger over the interval, which is almost always the leak. The same trick works for alloc_space if you want to know what's been generating GC pressure over a window.
The "do a runtime.GC() first" trick from earlier matters for heap profiles too. The HTTP endpoint accepts a gc=1 query parameter that runs a GC before sampling:
curl -o heap.out "http://localhost:6060/debug/pprof/heap?gc=1"This gives you the cleanest possible inuse_* snapshot: everything in the result is genuinely reachable, not garbage waiting to be swept.
I wrote a longer companion piece on Go memory specifically, covering escape analysis, the GC, allocation patterns, at Memory Management In Go: Escape Analysis, The Garbage Collector, And Profiling Allocations. If memory is your symptom, that one goes deeper on the allocation side; this article is about the tool you'd use to find what's wrong.
The goroutine profile
This is the profile that has saved my afternoon more times than the other three combined. Goroutine leaks are the single most common Go pathology, and the goroutine profile finds them in about thirty seconds.
What it shows
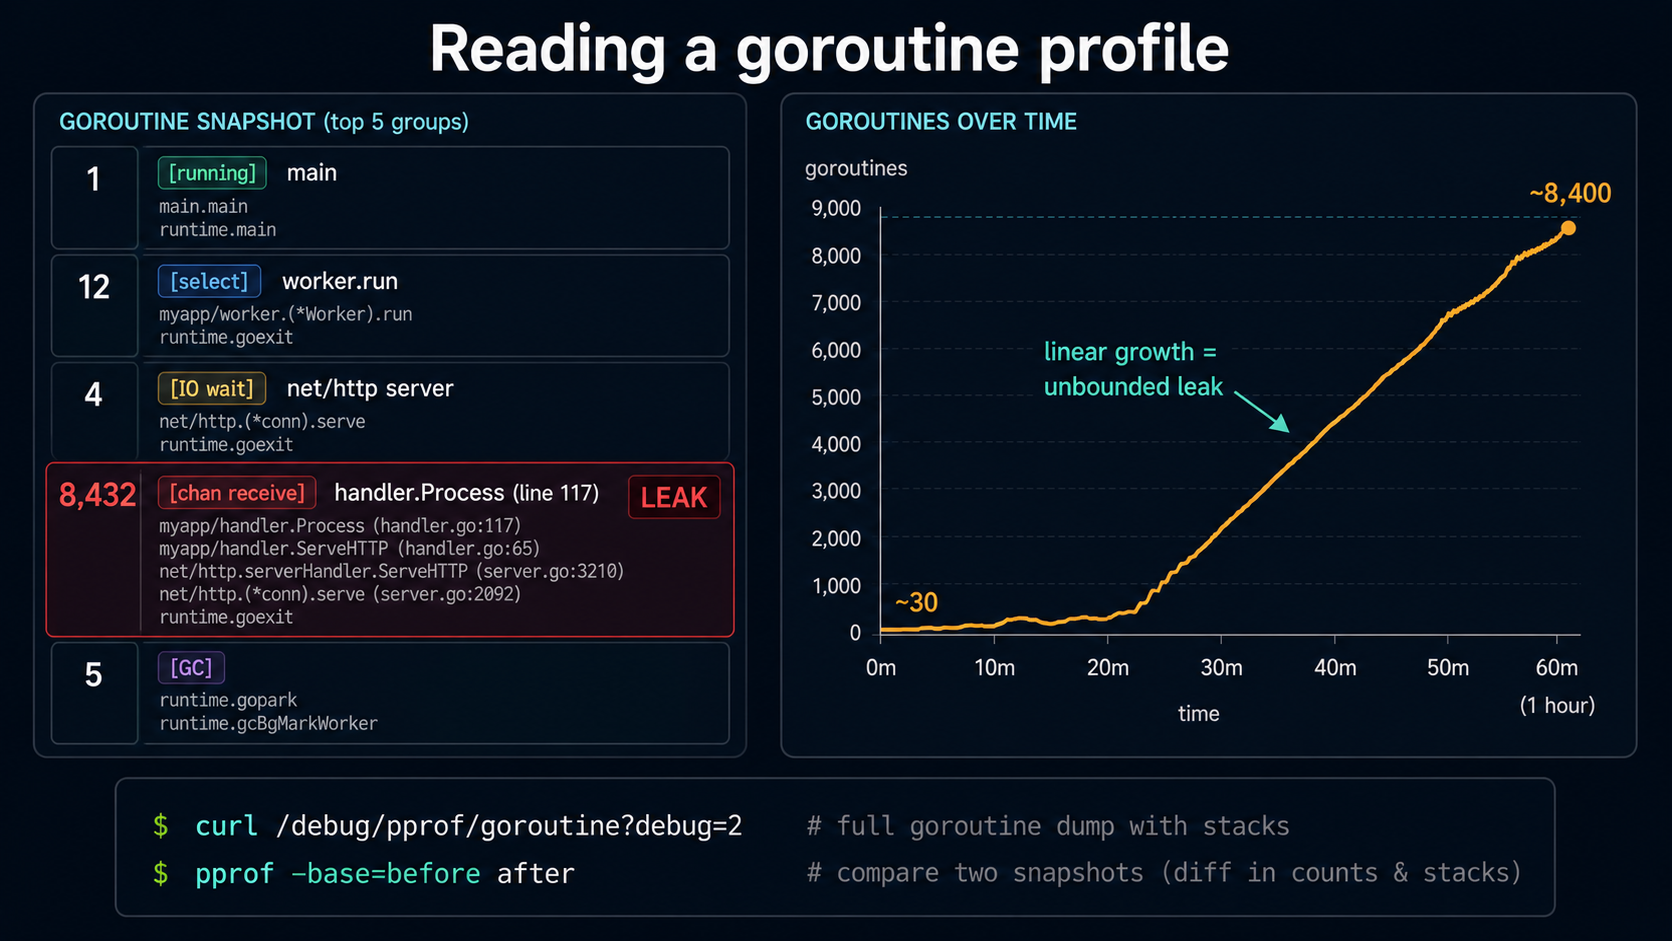
The goroutine profile is a snapshot, not a sampled-over-time profile like CPU or heap. When you request it, the runtime stops the world briefly, walks every goroutine, captures its stack, and groups them. The output is "here are the unique stack traces, and here's how many goroutines are sitting in each one."
# pprof-format, opens in pprof
go tool pprof http://localhost:6060/debug/pprof/goroutine

# text format, full stacks of every goroutine — readable directly
curl http://localhost:6060/debug/pprof/goroutine?debug=2
The ?debug=2 URL is the one you want when you're not sure where to start. It's a plain-text dump of every goroutine in the program with its full stack and its state (running, runnable, waiting on a channel, syscall, etc.). For a service with 500 goroutines it's a few hundred kilobytes; you can read it in less.
A typical entry looks like:
goroutine 4523 [chan receive, 47 minutes]:
github.com/example/svc/internal/worker.(*Pool).run(0xc0001a4000)
        /app/internal/worker/pool.go:88 +0x12d
created by github.com/example/svc/internal/worker.NewPool in goroutine 1
        /app/internal/worker/pool.go:45 +0x9c
Four things in there are useful:
- The state and how long it's been there:
[chan receive, 47 minutes]. A goroutine that's been blocked on a channel receive for 47 minutes is either correct (a long-running worker) or stuck (a leak). - The full stack at the moment of the snapshot. You can see exactly which line it's parked on.
- Where it was created. "Created by X in goroutine Y" tells you the spawn site. Useful for tracing leaks back to their origin.
- Group counts in the pprof view. If 9,500 goroutines all share the same stack and they've all been there for 30+ minutes, you found your leak.
A practical goroutine leak workflow
# 1. Get a baseline count
curl http://localhost:6060/debug/pprof/goroutine?debug=1 | head -1

# 2. Wait, then re-check
sleep 600
curl http://localhost:6060/debug/pprof/goroutine?debug=1 | head -1

# 3. If the count is growing, get the diff in pprof
curl -o gor1.out http://localhost:6060/debug/pprof/goroutine
sleep 600
curl -o gor2.out http://localhost:6060/debug/pprof/goroutine
go tool pprof -base=gor1.out gor2.out
The first command shows a single header line like # 0xa1b2c3 goroutine profile: total 1234. If that number is climbing in lockstep with uptime, and not bounded by something like a worker pool's size, you have a leak. The diff at the end pinpoints which stacks contributed the growth.
The most common shapes of leak you'll find:
- A goroutine waiting on a channel nobody will ever send to. Stack frame says
chan receive, lifetime is "however long the service has been up." - A goroutine waiting on a
sync.WaitGroupwhose counter will never reach zero. Stack frame sayssemacquire. - A goroutine stuck in an HTTP client read with no timeout. Stack frame says
net.read, lifetime is "as long as the bad peer keeps the connection open." This is a real one:http.Client{}with noTimeoutis the most popular Go bug in the world. - A spawned-per-request goroutine that outlives the request's context. The fix is "respect
ctx.Done()."
Every one of these is obvious in a goroutine profile because they share a stack trace. Hundreds or thousands of goroutines parked in the exact same line of your code is the smoking gun.
A small but important detail
The goroutine profile stops the world to capture the snapshot. The stop is brief, typically milliseconds, but it scales with goroutine count. A service with 100,000 goroutines and a giant heap will have a measurable pause when you scrape /debug/pprof/goroutine. Don't poll it every second from your monitoring system; poll it on demand or on a long interval.
The ?debug=2 text variant is even more expensive because it formats every stack as a string. For monitoring, prefer the binary pprof format and the goroutine count (debug=1 returns just the header). For investigation, debug=2 is worth its weight.
The block profile
Now the underused ones. Block and mutex profiles tell you about off-CPU time, moments when goroutines are waiting. Things that don't show up in a CPU profile at all, but that absolutely show up in your latency dashboards.
What "blocking" means here
The block profile records events where a goroutine blocks on a synchronization primitive: an unbuffered channel send/receive, a select, a sync.Mutex.Lock that has to wait, a sync.WaitGroup.Wait, a sync.Cond.Wait, an I/O operation that goes through the netpoller, and so on. It does not record blocking on syscalls that bypass the netpoller (some kinds of file I/O, for example).
A blocking event is recorded with the duration the goroutine spent blocked. The profile shows you which stacks accumulated the most blocking time over the sampling window.
Enabling it
Block profiling is off by default. Enable it with runtime.SetBlockProfileRate(rate):
// sample every blocking event (1 ns threshold)
runtime.SetBlockProfileRate(1)

// only sample events that lasted at least 1ms (1,000,000 ns)
runtime.SetBlockProfileRate(1_000_000)

// disable
runtime.SetBlockProfileRate(0)
The argument is a nanosecond threshold: a blocking event is recorded as a sample with probability event_duration / rate, so a rate of 1 samples everything and a rate of 1_000_000 effectively samples events ≥ 1ms. Higher rate = fewer samples = less overhead. For an investigation, 1 is fine for a minute or two. For continuous production profiling, set it to something like 10_000 (10μs) and live with the loss of very-short events.
Capturing it
go tool pprof http://localhost:6060/debug/pprof/blockOr to a file:
curl -o block.out http://localhost:6060/debug/pprof/block
go tool pprof block.out
The endpoint returns a snapshot of accumulated events since profiling was enabled. You don't pass a duration; the data is whatever has been recorded so far. To get a "window," call SetBlockProfileRate at the start of your window and capture the profile at the end, or use a continuous-profiling tool that handles the windowing for you.
Reading it
Inside pprof, the same commands work. top will show stacks ordered by total blocking time:
Showing nodes accounting for 12.4s, 99.20% of 12.5s total
      flat  flat%   sum%        cum   cum%
     8.30s 66.40% 66.40%      8.30s 66.40%  runtime.chanrecv1
     2.10s 16.80% 83.20%      2.10s 16.80%  sync.(*Mutex).Lock
     ...
(pprof) list MyHandler
The units are time. Eight seconds of total blocking time in runtime.chanrecv1 across the sampling window is the program telling you "many goroutines spent a lot of cumulative time waiting on channels." Use list and the stack walk to find which channels and why.
The common patterns you'll find:
- Unbuffered channel between producer and consumer with one side much faster than the other. The slow side is the bottleneck; the fast side blocks on the channel waiting for it.
- A single shared resource behind a mutex. Every goroutine queueing up to acquire the lock shows as block time on
sync.(*Mutex).Lock. - A worker pool that's undersized for the workload. All the dispatcher goroutines are blocked on the channel into the pool, because the pool can't keep up.
- A
selectover many channels where one of them is starving the others. The slow-arrival paths look like block time onruntime.selectgo.
Block profile is the right tool for "my latency is bad but my CPU usage is fine." A program that spends 80% of its wall-clock time waiting will look healthy on CPU and dreadful on block.
The mutex profile
The mutex profile is the block profile's narrower cousin. It records contention on sync.Mutex and sync.RWMutex specifically: moments where a goroutine called Lock and had to wait because another goroutine was holding the mutex.
runtime.SetMutexProfileFraction(1)   // sample every contention event
runtime.SetMutexProfileFraction(100) // sample 1/100 events
runtime.SetMutexProfileFraction(0)   // disable
Note the difference: SetBlockProfileRate is a nanosecond threshold; SetMutexProfileFraction is a sampling fraction (1-in-N). Same idea, different units. Yes, that's confusing. Yes, the API is just like that.
Capture:
go tool pprof http://localhost:6060/debug/pprof/mutexThe mutex profile shows you which mutexes had the most contention and where the contending goroutines were calling Lock from. It's narrower than the block profile (mutexes only) and often more directly actionable. If a single mutex is responsible for most of your contention, the fix is structural: shard the lock, use a sync.RWMutex, switch to a lock-free data structure, or restructure the code so the lock isn't on the hot path.
The classic gotcha: a global cache behind a sync.Mutex. Every request takes the lock for read, every refresh takes it for write, and at 50,000 RPS the cache becomes the serialization bottleneck of the entire service. The mutex profile points at the cache; the fix is sync.RWMutex or sharded caches or sync/atomic.Pointer-flipped immutable snapshots, depending on the access pattern.
Comparing profiles: the diff workflow
This is the underused superpower. Reading any single profile is hard. Reading the difference between two profiles (before and after a change, or before and after a regression) is dramatically easier.
go tool pprof -base=before.out after.outThe output shows positive numbers where after is bigger than before and negative numbers where it's smaller. If you suspect a code change made things worse, this command tells you exactly what got slower (or what allocates more, or what waits more. It works on any profile type).
A workflow I use constantly:
- Capture a profile of the current state. Save it.
- Make a change.
- Capture another profile after the change.
- Diff them.
This is also how you verify a fix actually fixed the thing. "I refactored the parser" → diff says "json.Unmarshal dropped 8 seconds of CPU time, nothing else moved" → the change did what you wanted and didn't have a hidden regression elsewhere. Diff also catches the other common mistake: optimizations that look like wins in a synthetic benchmark but trade one cost for another in the real workload. Diff doesn't lie.
For continuous comparison, the web UI takes the same flag:
go tool pprof -http=:8080 -base=before.out after.outAnd you get all the same views, flamegraph, top, list, but rendered as the diff.
Continuous profiling
Everything above is "go grab a profile when something's wrong." That works, but it has a problem: by the time you grab the profile, you're in the middle of the incident, the conditions have changed, and you can't compare to a healthy baseline because you didn't capture one. Continuous profiling fixes this by recording profiles on a schedule, all the time, and storing them so you can go back and ask "what did this service look like an hour ago, before things got weird?"
The shape: a small agent in your service (or running as a sidecar) hits the pprof endpoints every 10-60 seconds, ships the resulting profiles to a server, and that server keeps them indexed so you can query "show me the CPU profile for service X between 14:32 and 14:35 yesterday." When an incident happens, you have before and during profiles already.
Tools in this space, all of which speak Go's pprof format natively:
- Pyroscope: open source, self-hostable, can ingest Go pprof out of the box.
- Parca: open source, eBPF-based variant of the same idea.
- Google Cloud Profiler / Datadog Continuous Profiler / Grafana Cloud Profiles: managed offerings, vary in pricing and Go integration depth.
The trade-off for continuous profiling is overhead. CPU profiling at 100Hz is cheap (a few percent in steady state). Heap is cheap with the default rate. Block and mutex profiling can be more expensive depending on rate. Most teams enable CPU and heap continuously and turn block/mutex on only during investigations. That's a fine starting point.
If you can't run a continuous profiler, the next best thing is a cron job that scrapes /debug/pprof/heap and /debug/pprof/profile?seconds=30 every few minutes and writes the files to disk or S3. It's a hack, but it gives you the "before" profile you need when the on-call page goes off at 2am.
When to actually do all this
A bias check: most Go services don't need any of this. The runtime is fast, the GC is competent, and the average HTTP handler that takes a few milliseconds doesn't have a bottleneck worth profiling. Premature profiling exists too: chasing microseconds in a code path that runs ten times per request is wasted work.
The conditions where pprof earns its keep:
- A real performance regression. A deploy made the service slower. CPU/heap profiles before-and-after will point at the cause faster than reading the diff.
- A latency mystery. Metrics show p99 climbing, CPU and memory look fine. Block + goroutine profiles, almost always.
- A memory leak. Resident set size grows without bound. Heap
inuse_spacediff over the leak window. - A goroutine leak. Goroutine count grows without bound. Goroutine profile,
debug=2for the full stack dump. - Capacity planning before a load test. You want to know where the bottleneck will be at 10x load before you find out on a Friday. Run a representative load test, profile, and you have a list of the next three things to fix.
- A hot path you genuinely need to make faster. A serializer, a parser, a request handler that runs millions of times. Profile, optimize the top of the flamegraph, profile again, repeat.
For everything else, write clear code, run the standard benchmarks, ship it, and check a profile only when a number on a chart tells you to. pprof is a tool for answering questions you have, not a thing to run because you feel guilty about not running it.
But when you do have a question, when latency is up and you don't know why, or memory's leaking and the dashboards aren't telling you what: pprof is the difference between guessing and knowing. The runtime is recording everything you'd need to find the cause. You just have to point the tool at it and read what it has to say.
Next time someone in #incidents asks "so what's it actually doing?": answer with a profile, not a guess.


